


Most would lead a diamond without much thought. However, a top spade lead is better:
- It might catch spade length from partner. You might beat the hand with 5 spade tricks when a diamond lead would give declarer overtricks.
- If you choose to switch at T2, you will do it after having seen the dummy. Occasionally you can find a devastating heart or club switch that you would never consider without first seeing the dummy.
- Finally, if attacking diamonds is best, you can usually still switch effectively at T2.
- QTxxx
- KJxxx
- AQxxx
The opponents have approximately 31 HCP and you hold 7. Partner has about 2. What does that tell you about the chances that partner will hold the  Q? You got it–he won’t. When partner is broke, strive not to blow a trick. A club is your safest choice. Not only is partner unlikely to hold a spade honor, he is also unlikely to hold a club honor. A lead from xxx when partner rates to hold xx, xxx, or xxxx is quite safe. If you had held no outside cards, the chance of catching the Q from partner would improve, but not enough to justify the risk of blowing a trick.
RULE: When partner is short on high cards, a dangerous lead away from a tenace is likely to cost a trick. (The reverse is also true: the more high cards partner rates to hold, the safer it is to lead away from a tenace).Long Suit Tricks Are Worthless When You Do Not Need Them
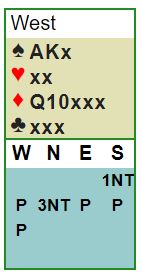
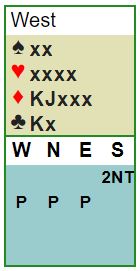
When defending 6NT, your goal is to score 2 tricks, not 5. The easiest way to score 2 tricks is to take two honor tricks–long-suit tricks have no value to you. Could a spade lead be right? It could, but not because you want to develop the spades. Partner might hold either the A, or the Q plus an outside honor, in which case the spade lead might develop the honor tricks to beat the contract. But given that partner holds only 3-4 HCP on this auction (since opponents hold 32-33 and you hold 4) the odds are strongly against it.
Let’s contrast the first deal with a second one. Once again you need only 2 tricks, but this time you have been warned that dummy has a long running suit. If you lead passively, you will often become a spectator as declarer cashes the first 12 tricks. Further, since part of dummy’s strength is its distribution, the opponents usually have fewer HCP which increases the chance your lead will catch an honor.
RULE: When you need only a few tricks to beat a contract, focus on developing honor tricks. Beating a 6NT contract via honor tricks normally suggests passive defense. The exception occurs when they have a long suit to run. Then you may need to attack and hope for the best.Could That Honor Trick Cost The Contract? Assume you are playing IMPs. Let’s take one hand and contrast two similar auctions. Auction 1
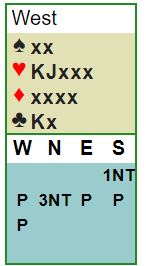
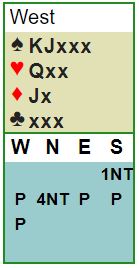
The heart lead has a lot going for it. To beat 3NT, you will need long-suit tricks, so a heart lead gives you a chance for a large reward. Furthermore, when a heart lead blows an honor trick, often that will only cost an overtrick. A heart lead could cost the contract, but not often. Your potential gain by leading hearts is high; your potential loss is low.
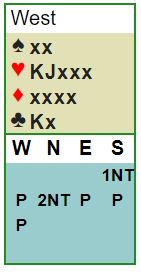
RULE: in a close contract like 2NT, surrendering an undeserved honor trick will more often cost the contract. Lead more passively.Make Declarer Sweat
- catch a fitting honor and “win”
- catch a layout where the lead does not gain but does not cost a trick — “break even”
- lead into declarer’s tenace and “lose”
RULE: Any time declarer has shown a big balanced hand, passive defense rates to be best.Conclusion Before you automatically place a thumb on the fourth from your longest and strongest, consider the full context of the auction. The auction will tell you things like:
- Declarer will have a hard time playing this on his own. I should lead passively.
- The contract will be close, I can’t afford the risk of giving him his contract-making trick.
- The opponents have the points, My lead is unlikely to catch a fitting card, so will probably blow a trick.
- The opponents have a long running suit. I better try to cash my tricks ASAP.
- My RHO has a rock. Leading into him will be like banging my head into it.


