Hand 1 Dealer South
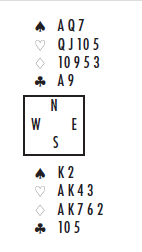
Lead:

K
West leads the
K against your small slam in hearts. How will you play the hand? (You will find that East holds four trumps.)
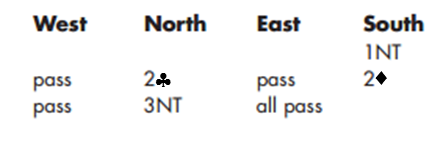
Hand 2 Dealer South

Lead:

Q
West leads the
Q against 3NT. How will you play the contract? (West starts with Five spades.)
Hand 3 Dealer South

Lead:
10
How will you play the contract when West leads the
10?
Hand 4 Dealer South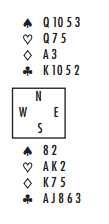
Lead:

J
How will you play the contract when West leads the J?
⇓
⇓
⇓
⇓
⇓
⇓
⇓
⇓
⇓
⇓
⇓
⇓
⇓
⇓
⇓
⇓
⇓
⇓
Hand 1 Dealer South 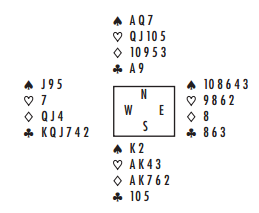
Lead:
K
West leads the
K against your small slam in hearts. How will you play the hand? (You will find that East holds four trumps.)
You cannot afford to draw all the trumps, since this will leave you with no protection in clubs if a diamond has to be conceded. Instead, attempt to set up the diamonds before drawing trumps. The dangerous case is when East has a singleton diamond. If you simply play the ace and king of the suit, East will ruff the second honor and you will lose a further trick on the third round of diamonds.
To protect your second diamond honor from an adverse ruff, you must use the avoidance play of leading towards it at the key moment. Cash the

A at Trick 4 and play three rounds of spades, throwing your club loser. Then lead a second round of diamonds towards your hand. IF East ruffs, it will be the only trick For his side. You will follow with a low diamond and claim the remainder. If instead East declines to ruff, you will win with the
K and South render a third round of the suit to West. You can then ruff his club return with the king and enter dummy with a hump to draw East’s remaining trumps. Time to claim the contract!
Hand 2 Dealer South 
Lead:
Q
West leads the
Q against 3NT. How will you play the contract? (West starts with Five spades.)
You have eight top tricks, so one extra trick from the diamond suit will bring your total to nine. When dia-monds Fail to divide 3-2, you cannot afford to concede a diamond trick to West since he will have two more spades to cash. You must therefore look for a safety play that will keep West off lead. You should lead the
3 towards dummy. IF West Follows with a low diamond, you will cover with the
8 (ducking into the safe hand). You don’t mind if the finesse loses because the remaining four diamond tricks will be yours. Suppose instead that West plays the
J or
10 on the First round. You will then win with the
K and return to your hand with a heart to lead another diamond towards dummy. IF West plays the last outstanding diamond honor, the whole diamond suit will be yours. Otherwise you will Finesse dummy’s
8, again guaranteeing the contract.
Hand 3 Dealer South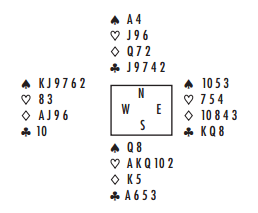
Lead:
10
How will you play the contract when West leads the
10?
If clubs are 2-2, the opening lead being from
10-8, all will be well. After drawing trumps, you will be able to set up the clubs and discard a spade for an overtrick. How can you Southvive the more likely situ-ation where the
10 is a singleton? Whether or not you cover with dummy’s
J, forcing an honor from East, you will go down if you win the First round of clubs. East will be left with two club winners. When he takes the first of these, he will switch to spades and the defenders will then score four tricks. An avoidance play is needed to prevent East from a timely spade switch. You must play low from dummy on the first trick and allow West’s
10 to win! West’s only safe switch is a trump. You win, draw trumps in two more rounds and then play ace and another club. East switches to spades, too late from the defenders’ point of view, and you discard your spade loser on the fifth round of clubs. You lose just two clubs and a diamond, making the game exactly.
Hand 4 Dealer South 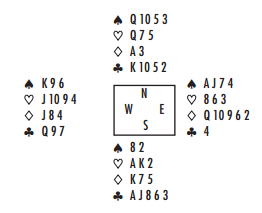
Lead:
J
How will you play the contract when West leads the
J?
Suppose you follow the ‘popular line at your local club’, winning the heart lead and playing the two top clubs. You will go down. When West wins the third round of clubs he will appreciate that the defend-ers almost certainly require four quick hicks in spades. It is then but a short step of logic for him to switch to the nine of spades. This is covered by the ten and jack and East will return a low spade to the king. West can then lead the
6 through dummy’s
Q 5 to East’s awaiting
A 7 and that will be down one. However the cards lie, the defenders cannot score four spade tricks when East has to make the first lead in the suit. West would have to win the first round with the ace or king and you could then cover his return, leaving dummy with a certain stopper. So, you should make an avoidance play in clubs to keep the dangerous West hand off lead. Cash the
A and Finesse dummy’s
10 on the second round. If East wins with an originally doubleton queen, he cannot break the contract.


