Source: Counting at Bridge By Larry Matheny
Do you wonder how the experts always seem to guess right against you? One of the reasons is they know how to use of the basic technique of counting. This may involve counting points or the number of cards in an opponent’s hand. This may seem difficult but it often involves no more than counting to thirteen.
Let’s start by counting an opponent’s distribution:
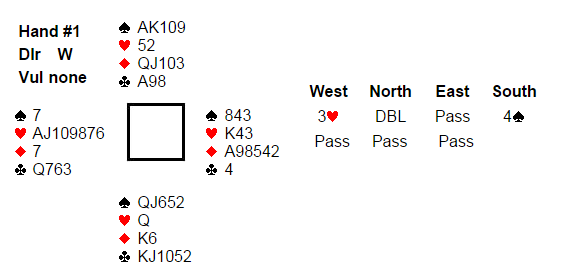
West led his singleton diamond won by the ace. East returned the nine of diamonds, a suit preference for hearts (higher ranking side suit). West ruffed but since he held no more trumps, followed with the ace and another heart. Declarer ruffed, drew trumps, and then had to find the queen of clubs to make his game. His first instinct was to place it in the East hand but he stopped to see what information he had uncovered. First, West surely had seven hearts for his vulnerable preempt. The play proved West held only one diamond and one spade so that left him with four clubs and the problem was solved. When East followed with a low club on the king, declarer confidently played another to dummy’s nine. All declarer had to do was count to thirteen.
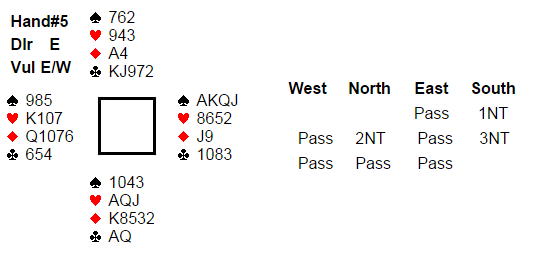
Sit in the South seat and see how you would have done with this next hand.
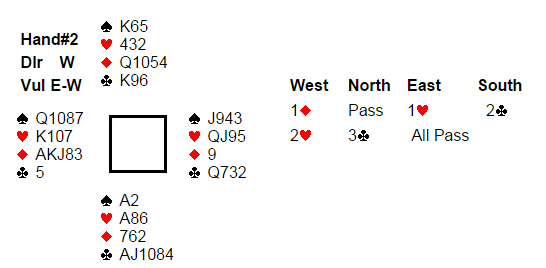
West played three rounds of diamonds with East ruffing the third one. East now switched to the queen of hearts and you stop to analyze your position. You can pitch one heart loser on the queen of diamonds but will have to lose the other. That means you cannot afford to lose a club. All of the clues are present for you to know the exact distribution of the opponents’ hands.
First you know West started with five diamonds. West would not have raised hearts without three card support and East must have four of them. The spades must be divided 4-4 or they would have been bid. This leaves West with only one club so you lead to the club king in dummy and then the nine for a finesse. By simply COUNTING each suit, you discovered West started with 4-3-5-1 distribution.
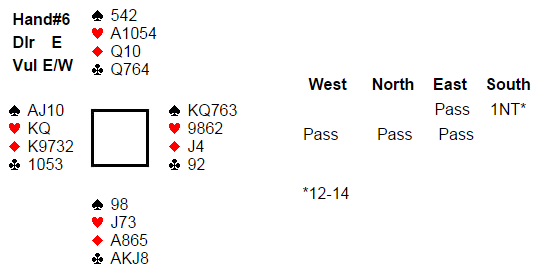
Here’s another with you again in the South seat.
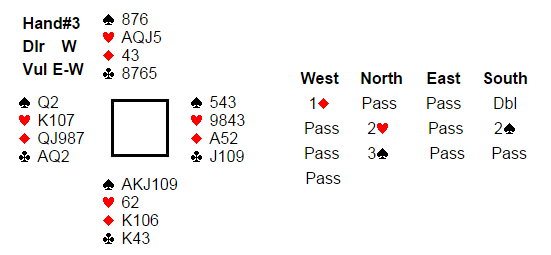
West’s lead of the queen of diamonds is won by East with the ace. East now switches to the jack of clubs which you duck. He continues with a club won by West with the queen. West cashes the ace of clubs and exits with a heart. You’ve lost four tricks so how do you bring in the rest?
Just REMEMBER THE BIDDING and the solution is easy. East passed his partner’s bid and has shown up with the diamond ace and the jack of clubs. That means the heart king and the spade queen are both in the West hand. You must play for the spade queen to drop under your ace or king. This didn’t involve counting past five.
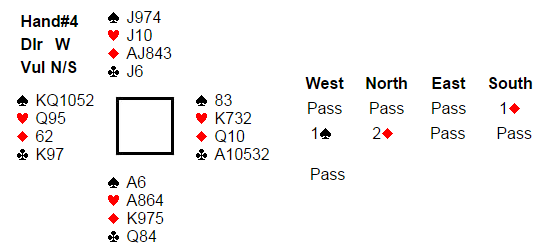
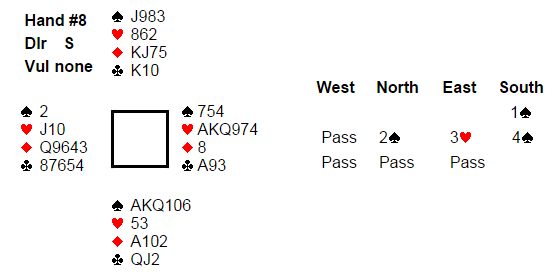
West led the spade king won by South. As is usually the case, declarer saw that it would be easier to establish the hand with the long trumps so he fired back a spade at trick two. West won and played a heart to the king and ace. Declarer guessed trumps correctly by playing the top two rounds and exited with a heart to West’s queen. Saying later he was afraid to switch to a club in case South held the ace and queen, West got out with the heart nine. Declarer trumped this in dummy, led a diamond to his hand, and played the eight of hearts discarding a club from dummy. He then conceded a club and scored +130 for making four. A diamond partial was the popular contract but most defenders took one spade, one heart, and two clubs for -110. How should West know he could safely switch to a club? Declarer had shown up with the ace of spades, the ace of hearts, the king of diamonds, and a balanced hand. If he had also held both club honors, he would have opened 1NT.
Note there was nothing difficult about this hand but that’s what makes matchpoints (pairs) a different game from rubber bridge or team games. Each overtrick or undertrick can be as important as getting to the right contract. To be successful, you must remember the auction and
count the high cards in declarer’s hand.
Here is another example that shows the importance of remembering the auction. Once again, simply counting will help you place the opponents’ honor cards.
Scoring: Matchpoints (pairs)
It sounded to West as if a major suit lead would be best so he led the nine of spades. East won the first four spade tricks and on the last spade, West discarded the ten of hearts. When East continued with a low heart at trick five, declarer paused to see if there was any way to make the hand if the king of hearts was off-side. Reflecting on the auction, declarer came to the conclusion that East would have opened the bidding if he held the heart king along with that spade suit. Therefore, declarer won the ace of hearts, cashed the ace-queen of clubs, and went to dummy with a diamond. The last three clubs were played and West was squeezed. He had to discard from K and Q10 while declarer had the K8 in his hand the 9 in dummy. Making three was the top score on this hand.
Even if you know nothing about squeeze play, it must be clear that the heart finesse was doomed to fail.
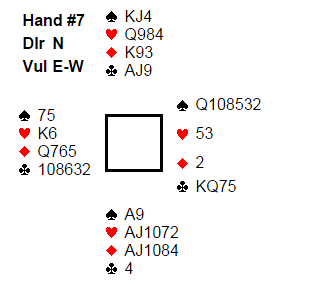
Let’s take a look at another hand where the best defense was just a matter of counting to thirteen.
West led a low diamond and declarer guessed wrong and played the ten from dummy. Declarer won the jack with the ace and led a low heart to the queen and ace. Next he led a low heart to his jack and the king. West cashed the diamond king and then the nine. On the third diamond, East discarded the nine of clubs. This partnership uses “upside-down’” attitude signals so the nine said “I have nothing in clubs”. West quickly added up declarer’s known high card points: 1 in hearts, 4 in diamonds, and 8 in clubs. That meant East must hold both the king and queen of spades. It was then easy for West to shift to the ace, jack, and ten of spades to beat the contract two tricks. As you saw, proper defense involved nothing more that communication and
simple math.
Now let’s use counting to find a queen.
You bid all the way to 6

and West leads a low club which you win with the ace. Next, the nine of hearts loses to the king and a club came back and you ruff. How should you continue?
Far too many players would simply try to guess the location of the queen of diamonds. The expert will try to find out more about the hand. After he draws trumps, he ruffs dummy’s last club and next takes the top spades and ruffs a spade. When West discards on the third spade, declarer knows East began with six spades, two trumps, and since West’s lead of the three of clubs suggests no more than five clubs, South can place East with at least four clubs. That means East can hold no more than one diamond so South cashes the ace and lets the jack of diamonds ride. It’s amazing how often the number thirteen comes up at bridge.
Let’s find one more queen:
 SUMMARY
My intent with this lesson was to show that counting is very important and not always that difficult. The solution to each of these nine example hands involved the basic principles of 1) Counting, 2) Remember the Auction, and 3) making Logical Assumptions from the information received. I highly recommend you slow down when you declare or defend and use these valuable tools.


