Source:
ACBL Bulletin January 2017
Bridge maxims you thought were true but aren’t By Mel Colchamiro
Read Part 1
In Part 1 we debunked five popular “rules” related to bidding. This month we continue with defensive guidelines that need some refining.
6 -Third hand always plays high.
Sometimes third hand plays “almost high” and sometimes not high at all. Not many players or teachers understand that the “third-hand-high” rule came about in the days of whist, where there was no dummy. Since 1925, the real rule is “third hand plays high – unless there is a compelling reason not to.”
Here are three compelling reasons:
1- When you have two or more equal high cards, you play the lowest of equals to help partner place the missing honors. That’s not much of an exception because the card you play is equal to your highest.
2- You, as third hand, have a tenace, or what I call surrounding cards. Your highest card and second-highest card are one above and one below dummy’s highest card.
For example:
Dummy  K 6 5 K 6 5 |
|
|
You A Q 3 |
If partner leads a low spade and declarer plays low from the dummy, you don’t need me to know that you should play the queen, not the ace. But as the surrounding cards get lower, it may become less obvious what card you should play. In each case the dummy plays a low card.
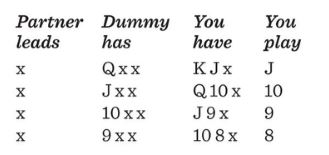
And so on. This is a variation of playing the lowest equal cards, but you take dummy’s cards into account and play the lowest of equal visible cards. Say partner leads the

10 and the dummy on your right has
K 4 3 2 and plays low, if you have
A Q J 5, you should play the
5 – third hand low! In this case, partner’s 10 is the lowest of equal visible cards. So don’t just think “third hand high.” Think!
3- This one players get wrong all the time. Partner leads the

8. The dummy comes down with
J 10 9 2, and declarer calls for the jack. You, third hand, have
Q 7 6 4, What do you play? If you said, “The queen: third hand plays high,” you’d be making a bad error. Suppose the full layout is this:
If you cover the jack with the queen, declarer makes four tricks. If you withhold the queen, declarer makes only three tricks, even though she may win the first one cheaply with dummy’s jack. Lay out the cards and try it. This is but one example of an extraordinarily common theme. To put this understanding into action, consider using what I call “Mel’s Chorus Line Rule,” named for the Broadway show “A Chorus Line,” whose signature song is “One (Singular Sensation).”
Here’s how the rule works. If you are third hand, and you can determine that partner does not hold a high honor card in the suit she has just led and you have one singular honor card, do not play it. It is a big-time exception to the third-hand-high rule.
7 – Always return your partner’s suit.
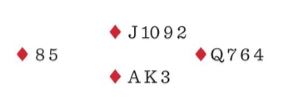
Not true at all – especially defending a suit contract. On defense versus notrump, it is usually a good idea to do so, but against a suit contract, it may or may not be the correct defense to return partner’s suit. Look at these two simple examples with the dummy on your right:
Suppose the opponents bid to 4
and partner leads the
Q. Declarer wins with the ace in her hand and leads a spade to the king and your ace. Should you return a diamond, the suit that partner led? No way! You know from partner’s lead that declarer has the king and the dummy will be void after the second round of the suit. Shift to a heart, or maybe return a trump. But if the dummy was only slightly different – change the fourth heart to a third diamond – now returning a diamond makes sense. Maybe you can establish partner’s known
J. If this were a notrump contract, then viewing either dummy, yes, return a diamond. Help partner develop as many diamond tricks as possible. Return a diamond, pronto!
8 – Always cover an honor with an honor.
Nope. Don’t always do that. In addition to the (mis)stated third-hand-high rule, cover an honor with an honor is really a shortcut version of the real rule: Cover an unsupported honor with an honor. It is a rule for second-hand play. Look at this example:
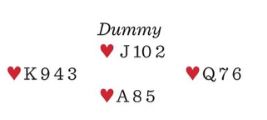
Suppose the declarer is in the dummy and leads the jack. If you cover with the queen, declarer will win the ace and load low towards dummy’s

10. No matter what partner does, declarer will always win a second trick with the
10. But see what happens if you (correctly) withhold the queen. Declarer will play low and partner will win the king leaving

Now, as long as the defenders wait until declarer plays the suit again, declarer can’t make a second trick. If she leads the
10, now you cover with the queen and partner’s
9 stands up. And if it turns out declarer has the
9, you were never entitled to a second trick no matter what you did. There are countless variations of this principle. It’s a universal truth.
9 – Signaling tells partner what to do.
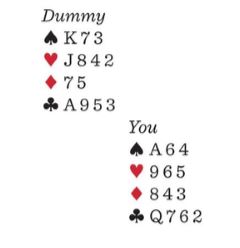
Bridge players are not robots or slaves. Signaling is a way of (legally) communicating information between the defensive partners. A positive signal doesn’t command: “Play this suit.” Rather it says, am strong in this suit.” Armed with that information, the partner’s responsibility is to assess the situation and make a wise choice. Look at this example:
Suppose West is on lead with four cards left and cashes the
A. Partner signals positively in hearts. Does that mean you should play a heart? No! Not at all. Knowing what you know. just play another spade, putting declarer in her hand and wait for her to break hearts! Playing a heart yourself – being a “good” or “obedient” partner – will just give declarer an extra trick. There are many other examples of this. Help your partner know where you are strong and/or weak Don’t give orders.
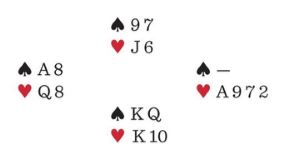
10 – Never underlead an ace against a suit contract.
On opening lead in a suit contract, we can’t afford to underlead our ace, because we may never get to use it later. Also, unlike defending a notrump contract, where the opportunity to set up multiple tricks makes giving up a trick worthwhile, underleading an ace may present declarer with an unwarranted trick without any possible multiple-trick compensation for us in return. However, in the middle of a hand, underleading an ace is not only not a no-no. it is often the thing to do. Here are two such situations. First is when the dummy is on your left:
If the declarer has the
Q, she will win two tricks and you will win one, pretty much no matter what. But if partner has the
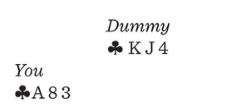
Q, your side has a chance for two tricks. You can increase your sides chances to get those two tricks if you underlead your ace, hop-ing declarer will play dummy’sjack. If she does, your partner will win her queen and your maneuver will have succeeded. If declarer plays dummy’s king. you’ll probably get your ace down the line. The second example is when the dummy is on you right

You can put declarer to the test if she has
K J x or
K-x-x if you shift to a low card here. Many declarers won’t be expecting you to do what you are doing and will not play the king. If not, yay!
But beware: only do this when the dummy’s highest card in this suit is the jack or lower and there is no reason to expect declarer has a singleton in this suit – it might be the king! If you lose to a singleton king, partner will not be happy and may let you know about it.
And when you say “Mel C. told me to do it.” I’ll deny I know you!


")
