Source: www.bridgewebs.com
MUCH BIDDING revolves around trying to locate a trump fit, often a 4-4 fit. Quite why this is so important is not often clearly explained, however. There are deals where a 4-4 fit may prove superior to an apparently better fit. In the deal below 6

may well make, whereas 6

is impossible when East turns up with the ace of clubs.
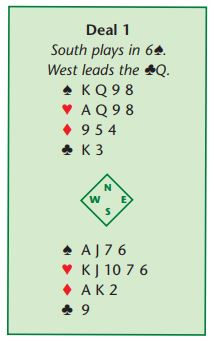
If you were to count your winners and losers in a contract of 6
, you will see that you have a club loser and a diamond loser with nowhere to pitch the latter. 6
, though, will make as the diamond loser will get pitched on the long hearts. If this is mysterious to you, the extra trick comes from making five spade tricks (that includes a club ruff in the South hand), five hearts and the

A-K. Played in hearts, you cannot make any more than four spades, five hearts and the
A-K. As usual, ruffing in the long hand (trumping a club in the South hand in this example) is a waste of time.
So, are 4-4 always better than 5-4 fits? Perversely, no – not at all. At slam level maybe, but not necessarily at game level – so you needn’t warp your bidding too much or fret over various possibilities in the auction. Where 4-4 fits are important (and the reader may be ahead of me here) is after a 1NT opening bid where two relatively balanced hands may well make more tricks in a 4-4 major fit than in 3NT. Mind you, given that 4
and 4
are one trick higher than 3NT, they’d have to, wouldn’t they . . . ?
Teachers are very keen to tell beginners all about the well-known Stayman convention without necessarily being clear about its rationale. So let’s try to dot the i’s and cross the t’s in this article. There are two types of hand where the 4-4 fit will gain extra tricks over 3NT with two balanced hands. One is where the trump contract gives declarer control:
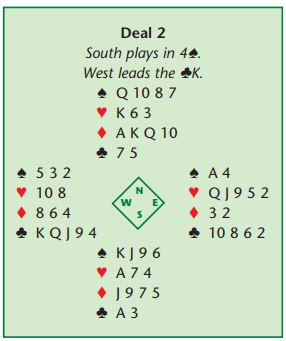
Here, 3NT is doomed by a club lead. In a sense declarer has enough tricks to make 3NT (three spades, two hearts, four diamonds and a club – which adds up to an overtrick, you’ll note) but the opponents have the tempo. They can set up four club tricks and gain the lead with the ace of
spades in order to enjoy them. In passing, it is worth noting than many no-trump contracts are races between the declaring side and the defenders. The one advantage that the defence has over declarer is that they get to go first…
Back to the subject matter. In Deal 2 declarer makes 4
because he has control of the hand. He can win the club lead, knock out the ace of spades, wait patiently while West takes a club trick and then he will regain the lead. Eventually he will have to concede a heart trick but by then everyone will have lost interest in the deal.
Then there are deals where 4-4 fits can generate extra tricks:
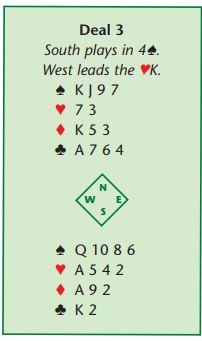
Here, 3NT is bereft of tricks on any lead. There are three spades, one heart, two diamonds and two clubs for a total of eight. Played in spades, though, declarer may well be able to ruff two hearts on table (or two clubs in hand). If he does so, he will make ten tricks (five trump tricks, one heart, two diamonds and two clubs). Here, then, the 4-4 fit is worth two extra tricks over no-trumps. Now, care must be taken in playing these deals. You have to Count Your Tricks and Plan Your Play (familiar themes, I hope). Try this one, played in 4
by South after a Stayman sequence:
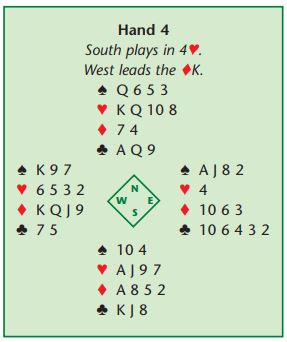
On the sight of dummy, South should pause and make a plan (I make no apology for the continually beating of this particular drum). A count of tricks (winners and losers) shows there to be . . . four heart winners, one diamond winner and three club winners. So that’s eight winners. In terms of losers, there are two spade losers and one diamond loser. As so often we have a discrepancy – eight winners, three losers.
We only have two ways of disposing of losers: we can either trump them or dump them (thanks are due to my American friend for this phrase). There is no source of tricks in either dummy or declarer’s hand that would allow any discards, so there is to be no dumping. The only way in which we can dispose of losers, then, is to trump them and we have to ruff two losers to raise the winner count to ten.
The important point, though, is that we must not be seduced into ruffing in both hands – with the 4-1 trump break that would be fatal. We either have to ruff two diamonds on the table or two spades in hand – but not both. So, win the ace of diamonds and concede a diamond. The ball is now in the defenders’ court. If they play three rounds of spades at us we aim to ruff two spades in hand (ruff the third spade, cross to a club, ruff the last spade and draw trumps). If West plays a red card (in practice, he is very likely to play a trump) we ruff a diamond on table, cross to hand, ruff another diamond on table, draw four rounds of trumps and cash the clubs.
Ten tricks come from six trump tricks, one diamond and three clubs. Note that drawing trumps would be fatal, as would any attempt to play this deal on some sort of cross-ruff. It is a major error with these deals to ruff in both hands.


