Source:
The Art of False Carding and Deceptive Play in Bridge By Paul Tobias

False Cards are Used By Defenders to
1) Give declarer a choice of how to play a suit when a non-false-card would leave no choice but the one that works for declarer.
2) Confuse declarer as to distribution of suits and high-card placement
3) Create the appearance of a line of play that will be advantageous for declarer that actually leads to trouble or the loss of an extra trick.
4) Steer partner into leading the suit you want led.
False Cards (or Deceptive Plays) are Used By Declarer to
1) Confuse defenders as to distribution of suits.
2) Confuse defenders as to high card placement and strength .
3) Make it hard for defenders to read come-on or length signals.
Note: We will pay special attention to false card plays that should be standard and automatic (sometimes called “Obligatory”) but are rarely used by intermediate club players and even many advanced players. These can often pay off in match-point bonuses.
We begin with a few Declarer False Cards – more often called “Deceptive Plays” since declarer has no partner to worry about misleading when playing a card.
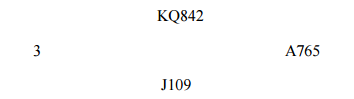
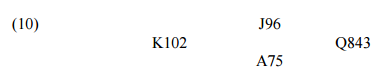
At a suit contract West leads the 3 of an unbid suit. How should declarer play?
Declarer knows the lead is almost certainly a singleton. He must do his best to make East think declarer has the singleton and the lead was from 3 to the J. Go up K in dummy and, after the A is played, follow with the 10 (not the J or 9). You want it to look like West led from J93 – a not unlikely possibility. He wouldn’t lead the 3 from J103 or 1093, however, which is why you play the 10. Many declarer false cards depend on the signaling methods used by the defense and are aimed at hiding the defenders’ true count or strength in a suit.
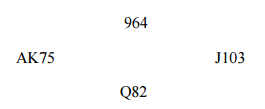
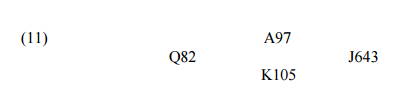
If West leads the K of the suit shown above (or A, if West leads A from AK). declarer would like him to continue with the A. East plays the 3 (standard signals) and declarer should conceal the 2 and play the 8. West might think East has Q32 and is encouraging continuation. If East/West are playing upside down signals, East still has to play the 3 or possibly give up a trick, so declarer should play the 2 to make it look like East wants a continuation.
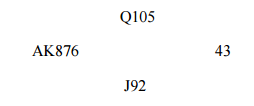
At a suit contract, with West having overcalled with the suit shown, the K is led (or A, if West leads A from AK). If East/West play standard carding, East plays the 4 and declarer should follow with the 2 (not the 9!). If East/West play upside down, after East plays the 3, now declarer should play the 9. It may not work – but you at least put West to a guess. Here’s a famous declarer deceptive play made long ago by Ely Culbertson.
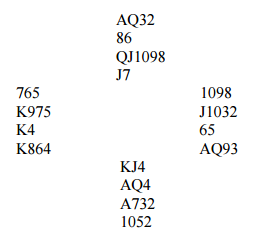
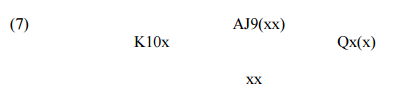
South opens 1

and ends up in an ambitious 3NT contract. West leads the

5 and East plays the
10. Declarer smoothly wins with the
A!! After a low spade to dummy’s Q, a losing diamond finesse was taken. Who could blame West for now under-leading his
K to the
Q he was sure was in partner’s hand. However, if declarer had won trick 1 with the
Q, West would very possibly have switched to the game defeating club suit.
Summary for Declarer: Find out about opponents signals and plan your play accordingly, including cards to follow suit with or win with, before playing to trick 1.
False Cards By The Defense
The opportunity for the defense to gain using false cards is much greater than for declarer. The only thing defenders have to be careful about is that they don’t deceive their partner when honest strength or count signals are needed (often when declarer runs a long suit and pseudo squeezes the defenders).
We begin with some so-called obligatory false cards. These are “Obligatory” because they do not cost anything and they may gain (no guarantee). The main idea is that in many situations, not following suit with your lowest card can give declarer options to go wrong that he would not have had otherwise. Many involve holdings in a strong suit of declarer’s (typically trumps). Key holdings to alert you to a possible obligatory false card are 10x, 109x, J10x, J9xx, K108x or K10x.

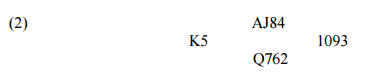
Declarer plays the A and intends to finesse with the J next (the standard, best percentage play. However, East plays the 10 under the A. Declarer reasons that might very well be a forced card from a Q10 holding (more likely than a singleton 10). So he plays to the K on the second round and loses an unnecessary trick. The same thing applies if East has 9x – play the 9, or if the AKJx(x) is in dummy.
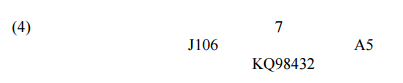
Declarer leads low to the J, intending, if it wins, to play the A next and pick up the entire suit whenever the K doubleton is on side. However, under the J, East plays the 10 (or 9). Now, declarer has another option: go back to hand and lead the Q. This picks up the whole suit whenever East has 109 and also protects against 2 losers if East has played a singleton. Even if declarer knows East might be false carding, he is likely to fall for this. Note that playing the 3 first leaves declarer with no choice but to succeed.
Variations: In this example, give East the 8 instead of the 9 and it is still right to play the 8 on the lead to the J. This might make it more likely for declarer to lead the Q the next time the suit is played. And, if the JC is in declarer’s hand (along with the 9) and led for the first trick, West should duck and East should play the 8. Declarer will most likely return to hand to lead the J.
This gets tricky for West, however, for if partner has the 109x he has to cover when the J or Q is led by declarer – an example of why defense is so hard in Bridge. Both (1) and (2) are easy to remember and cannot cost. Defenders should make the play of the 10 smoothly, without hesitation (think about it in advance, before declarer plays the suit!).

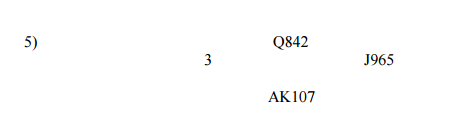
Declarer plays the A and, if East follows with the 4, has no choice but to continue with K and Q. If, however, you follow to the first trick with the 10 or J you give declarer a chance to go wrong. He may think Restricted Choice applies and play you for a singleton and go to his hand to finesse the 9 in dummy. Note: if dummy held AK10953 and East followed to the A with the Q or J, then Restricted Choice would apply and it would be correct for declarer to finesse. It does not apply in the hand shown solely because of the obligatory false card possibility.
Declarer leads to the Q. If West plays the 6, declarer has no choice but to next lead low – which holds the losers to 1. However, if West plays the 10 or J, Declarer can picture him holding the J10 and he would have to lead the K next to save a trick. So, he has an option to go wrong. West can suspect a situation like this if declarer had pre-empted the suit. In any case, it would be hard or impossible to construct a hand where playing the J or 10 loses a trick if declarer is known to have a very long suit.
Declarer, with a known 4-4 fit, lays down the A. If both defenders follow low, declarer will go to the Q, guarding against Jxxx in East (he cannot pick up J9xx in West). It works and declarer picks up the entire suit. But, what happens if East plays the 9 at trick 1. Now, declarer can pick up Jxxx in West’s hand and that looks like a likely holding after East follows with the 9. Declarer often will lay down the K at trick 2 – setting up East’s J for a trick. The 9 cannot lose and often will gain. Can declarer do anything to guard against this obligatory by East? Yes, he should lead the first round from dummy. East will be reluctant to play the 9 as it may cost if partner has the singleton 10.
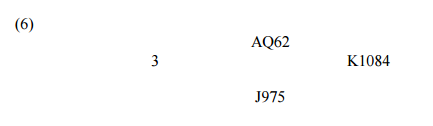
This is harder to recognize but worth learning. Declarer, with a known 4-4 fit, plays low to the Q. Look at what happens if you take your K: declarer’s next play has to be the A (he cannot pick up 1084 if that is in West’s hand). Then he finesses East out of the 10. Instead duck the K and play the 8. Watch declarer’s eyes light up as he figures that if East has the 108 doubleton, he can pick up the entire suit by leading the J and smothering the 10. That also holds 4 to the K10 in West’s hand to only 1 trump trick. So, East’s play of ducking with the 8 is likely to succeed and cannot cost anything!
The standard play for declarer is to lead low to the 9. That will work when West hold the 10 and an honor. West should give declarer a choice by playing the K when declarer leads to dummy. Declarer may win and lead low to the J the next time. Or, even better, if declarer lacks entries to run the suit, he may duck the K and lead low to the J the next time – not taking any tricks in the suit! (the same applies if the AJ10 are in dummy without other entries – declarer may duck the K and later finesse the J). The next several false cards are not clear cut enough to earn the label obligatory but are well worth trying.
Declarer leads to the K. If both defenders follow low, declarer has no choice but to play the A next. If West plays the J, declarer may play him for the QJ5 and go back to his hand for a finesse. At least you have given him a chance to go wrong.
Assume this is a suit declarer needs to run in order to make 3NT and dummy has no side entries. When declarer leads the 8, West knows the suit must run if declarer finesses the J. So, you play the Q over the 8! Declarer will be fearful of a 1-4 split and, in order to be sure of the contract, he might duck to guarantee 5 tricks. West will have stolen a trick with this false card!
(9) In the middle game, West has to lead this suit.
West should lead the Q. Declarer will almost always duck (the exception is when West is known to have the A). Next, West leads the 8. Declarer may play him for QJ8(x) and duck in dummy. Presto – the defense takes 3 tricks!
This is a “Frozen suit” which means neither side can lead it without (theoretically) losing a trick. Assume West is forced to lead the suit in an end position. What should he lead? If he leads the 2, declarer’s natural play is the 9 and declarer wins 2 tricks. He should lead the K and declarer might play him for the KQ and win the A and lead to the J. If West held KQ2, he should lead the 2.
As before, this is a frozen suit. If West is forced to lead it he should lead the Q giving declarer a choice and a chance to go wrong. The same is true if East is forced to lead the suit – lead the high honor, not low.
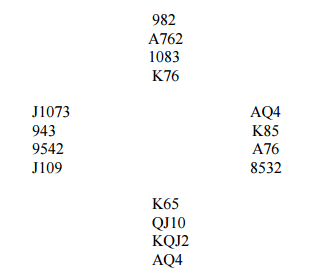
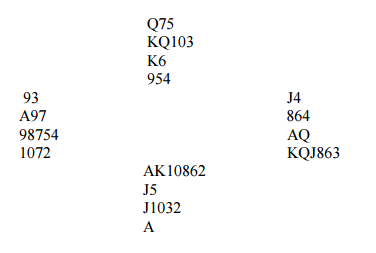
We close this article on defensive false carding with 2 complete hand examples.
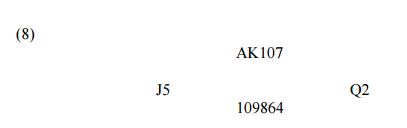
The auction starts with South bidding 1
and jumping to 2NT over North’s 1
bid. North raised to 3NT and West led the

3. It is normal for East, in 3rd hand position, to play her highest card. However, East can see that West has no possible outside entries and puts in the
Q. Declarer, afraid the
AJx lie behind him, must win the
K and hope the heart finesse is on – if so he loses only 3 spades and a diamond based on the 4th best lead of the 3. When the heart finesse loses, declarer goes down 1. If East rose
A at trick 1, declarer would have held up the
K until the 3rd round and made the contract.
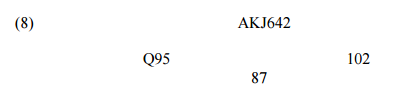
East opens the bidding with 1

and South overcalls 1
and eventually gets to 4
. West leads the 2
and West’s play to trick 1 is crucial (underscoring why it is always right to study the hand before playing to trick 1, both as declarer and defender. It is clear to East that the best he can hope for is 1 trick from partner, probably in hearts but perhaps the
K. Also, he won’t even get his 2 diamond tricks unless West leads that suit when he gets in. So, East plays the
K on the opening lead – a signal that denies the
Q! When West wins the
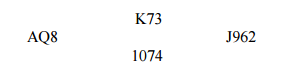
A, he knows to lead a diamond and hold the contract to 4, Just for the fun of it, one more example (from a Charles Goren article I read long ago) shows how a declarer can take advantage of deception in a novel way. The details are roughly as shown and this actually happened. Declarer is in a high level contract – possibly a slam. It can only make if the entire spade suit is picked up. Declarer has QJ1097 opposite A3. How would you play the suit? Here’s the actual suit layout:
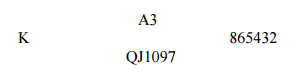
The brilliant expert declarer did not lead the Q (as mere mortals would) hoping for Kx onsides or a foolish cover from 3 or 4 to the K). Instead he made the deceptive lead of the 9. When it went K from West, he reasoned that no one would play the K over the 9 unless forced to and, after winning the A, finessed the 7 on the way back.
References
1. The Official Encyclopedia of Bridge, 7th Edition
2. Play of the Hand, Louis Watson
3. The Rodwell Files, Eric Rodwell & Mark Horton
4. Deadly Defence, Izdebski, Krzemien & Klingerfalse


