Source: February 2015 ACBL Bridge Bulletin

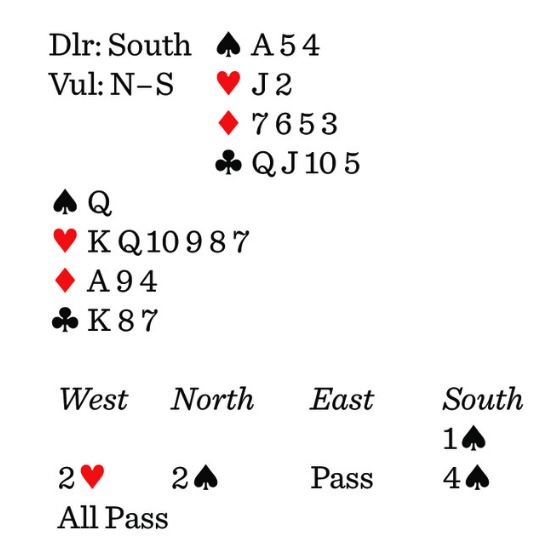
The following deal is interesting in that it offers all manner of things to think about. It’s a deal in which the play was not best, the sort of thing you run into all of the time. Sorting out what is happening in these cases can be difficult. Playing in a matchpoint event against an unknown declarer, you have the following problem as West:
You lead the

K, East playing the
3, and declarer the ace. Declarer crosses to the

A and back to the
K. East plays the
7, then the
2. Declarer leads the

A, on which East plays the
2. South leads a second club. How do you defend?
East’s high-low in trumps means, in your partnership, that he has three or five of them. Given the bidding, he is marked with three spades. East’s low heart at trick one denies a doubleton. East rates to have three hearts, although one or four is possible. Your partner just played the
2.
He has played four cards so far, all low ones, and they have given you a lot of information, assuming you were watching. Do you duck the club or do you take it? If you take it, what do you do next?
The winning play is odd, but it should be right if you consider the bidding. Win the club. East will follow with the 6, so you know for sure that declarer has three clubs. Next, cash the
Q. Partner and declarer follow. You know from partner’s heart plays that he has the missing heart. What then? Lead a club to dummy. You are hoping that declarer has two diamond losers. By leading a club, you give declarer a trick he was entitled to, but you destroy his hopes for a discard on the good clubs. Declarer can’t cash clubs because your partner will ruff. If you find this defense, you still need to take two diamond tricks, and that will depend on what your partner has in diamonds.
Here is the complete layout:

Declarer could have made 4
if he guessed to play the
K first, because that would leave a spade entry to dummy. South could also make 4
if he played the
A K and then conceded a heart trick. You would be endplayed. A diamond lead would give South his king, and a club lead would allow South to play three rounds of clubs, endplay-ing you a second time.
Note, by the way, that if West doesn’t cash his
Q before leading the third club, South will win the club in dummy and play a heart, endplaying West. How do you defend if declarer wins the first heart, crosses to the
A, and finesses the
Q into your hand? Do you win or do you hold up?
If you hold up and declarer finesses again, you can win the club and can cash your heart trick. Now you can lead your remaining club to declarer’s ace. He will be in his hand with no way to use dummy’s good club.
Is that all there is to the play? Not at all. When declarer finesses the
Q, you have to duck it smoothly. If you fuddle around for awhile before letting the
Q win, declarer will work out what is happening.
The point of the deal is that when declarer takes the club finesse at trick three, you must be ready to duck in tempo. If you are in the habit of watching partner’s cards, you should realize what is happening and be able to duck smoothly enough that declarer may talk himself into finessing again. Of course, if declarer plays a second heart instead, the defense rests.


")