Fuente: August 2016 ACBL Bridge Bulletin
This is a hard hand. One of the most important lessons of this is that it teaches the need to plan ahead and to keep thinking when things look grim.
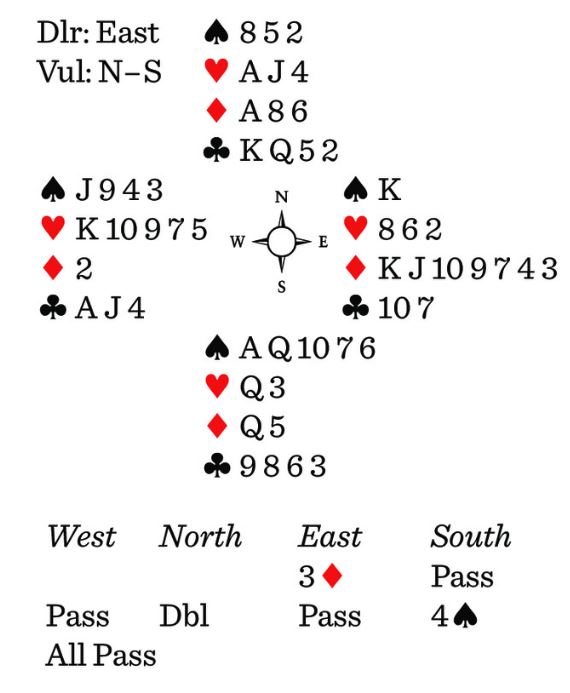
I normally don’t show you all four hands, but this one is easier to follow if you see the entire deal from the start. First, the bidding: East opens 3

, and that is passed to North. Would you double? Would you bid 3NT? Would you pass?
It’s not a comfortable decision. The shape suggests passing. The values suggest bidding. North listened to his values and doubled. South was torn between bidding 3

and 4
.
Given North was just making a balancing bid, 3
might be enough. If North was a passed hand, South would know that 3
was high enough, but North wasn’t a passed hand. South felt his excellent spade suit was enough to overbid a little, and he did. So 4
was the contract and the lead was the
2.
South saw that 4
was a marginal contract. He had the potential to lose three spades, a diamond and a club. If things were really horrible, he might lose even more tricks. But against that, South expected West to have most of the high cards. If East had the
J, for instance, South might make 4
, losing one spade, one diamond and a club.
The
2 was a sure singleton, so South took the ace at trick one. When he led a trump, East played the king. This was mixed news. If it was a singleton, then South had two spade losers. But if East was kidding around with K-x of trumps, things might not be too bad. Ask yourself, when you see an unexpected card, what it might mean. Is my opponent more likely to have a singleton king or might he be playing it from K-x? Knowing your opponent can help you in cases like this one.
It is logical to take the king at face value here, so South won the ace and proceeded on the assumption that East was an honest defender. What next? Take over as declarer.
Lead a club towards dummy. West will play low and the king wins. Continue with a spade, hoping East follows, but no, East discards a diamond. What now? Play low. Let West have this trick.
This gives West the first of many awkward moments. He can’t lead a heart away from his king. He can’t lead a spade, either. So he plays the

A and another club. Clubs divide, which is nice, but you still aren’t out of danger. You have another spade to lose and you have a diamond loser, too. What next?
Cross to the
Q and give West his spade winner. He is out of clubs, he is out of diamonds, he is out of spades, hence, he must lead a heart. When he does this, you expect to win your queen and will finesse the jack, getting rid of your diamond loser. No problem, except that West, instead of leading a low heart to your queen, leads the king!
You take the ace and your queen, and then try to get to dummy to cash the jack.
Last question: Is your remaining club low enough to get to dummy? When the play gets to this point, the club in dummy is the
5. You started the hand with the
3. Do you still have it? If yes, you can get to dummy to use the

J. If the
3 is gone, you are down one, losing the last trick to East’s
K. This is a hard hand. One of the most important lessons of this is that it teaches the need to plan ahead and to keep thinking when things look grim.
Don’t forget to follow us @


