Denver 2015: Fred Gitelman & his dog Phixr
Source: Canadian Master Point Magazine
Playing bridge like an expert isn’t about executing backwash squeezes and brilliant coups — at least, most of the time. It’s about concentration, hard work, and most of all. avoiding the errors to which lesser mortals are prone. Even the top players make mistakes, though — which is the point of this article — it’s just that they’re different from the ones that lesser players make.
Fred recalls one time approaching Michael Rosenberg, whom he had just watched make a play that had not turned out well and asking him why he had made the error.
Michael smiled at him. ‘Don’t you get it yet. Fred?’ he asked.
‘Nobody’s any good at this game; it’s just that the top players are less bad than the rest.’
Most bridge articles are about brilliant bids or plays by brilliant players. Believe it or not, these brilliant players also make their fair share of terrible bids and plays. This article presents three bridge problems, one each concerning bidding, play, and defense. The hands all come from the 1992 Fall Nationals in Orlando, and in each case a famous player made a horrible error.
I shall try to analyze how such good players can play so badly.
1. Bidding
You hold: J3 J62 43 AKQ752
You are one of Canada’s top players, playing in the finals of the Life Masters’ Pairs. You open one notrump (11-14) in first seat at favorable vulnerability. I happen to think that this is a terrible bid, but suppose that is what you decide to do. LHO doubles (penalty) and partner bids two clubs showing clubs and hearts. RHO skips the bidding all the way to six diamonds. Quick, your ten seconds are up… what’s your bid?
This is not a problem: do not even think about bidding seven clubs! The famous player holding this hand did so, partner had nothing, and the result was —1700. Six diamonds was cold, but so was six spades, so defending six diamonds would be only slightly below average. Bidding seven clubs was good for a complete zero. Although this result should not be too surprising, it has little to do with why you should pass.
This is an example of one of the main sources of expert error: the breaking of partnership discipline. Your one notrump opening was a deliberate distortion of your hand, a tactical action that is acceptable at pairs as you only have your partner to answer to. Once you open one notrump, however, you must stick with it. Your partner has told you he does not want to play in one notrump doubled and that he has some clubs and hearts; he has not invited you to sacrifice at the seven-level. After you take a shot and open one notrump. you must remain consistent and continue to treat the hand like a notrump opening.
This means that you have limited your hand and transferred the captaincy to your partner. You must stick by that decision. It does not matter whether seven clubs goes for 1700 or 1100. If you make bids because ‘it could be right’ or because ‘you felt like it’ and break discipline in the process, your partnership is doomed. Your partner will not trust you. He will not enjoy playing with you. And unless your table presence is as good as Zia’s (and he also has his share of silly results), your results will be terrible.
2. Defense
You hold: AQx KQJ92 QJxx A
It’s the LM Pairs again, and you and your partner are one of the top pairs in the history of bridge. Nobody is vulnerable. Your RHO opens an 11-14 notrump (these weak notrumps sure come up a lot!), you double for penalties and LHO passes. RHO alerts this pass and explains it as forcing a redouble, either for penalties or to show a one-suited hand. Partner passes, and RHO duly redoubles. You and LHO pass, and partner runs to two clubs. This is doubled by RHO and you run to two hearts. LHO bids two spades, ending the auction.
Partner leads 3 and dummy tables:
Your 9 forces the A, and declarer cashes the top diamonds, discarding a heart. Dummy’s third diamond is ruffed by declarer and the J is passed to your queen. You cash a top heart on which partner discards. How do you continue? The great player holding this hand made another common expert error: trying to get into the Daily Bulletin instead of counting to thirteen. He cashed the A and played a low heart for partner to ruff. Partner would know to give him a club ruff, and the trump ace would provide the setting trick. Brilliant defense!
Unfortunately, this was the complete deal:
Partner did not have a trump left and the ‘brilliant’ play resulted in declarer’s making an overtrick. While —110 would have been below average, —140 was a zero. Yes, partner and LHO bid their hands poorly and declarer proba-bly misplayed the hand, but the ‘brilliant’ defense was truly horrible. How could this have been avoided? At the time of the problem, you know that partner is either 1-1-5-6 or 2-1-5-5. If partner has 1-1-5-6 (more likely as partner ran to two clubs, not two diamonds), the underlead in hearts will be disastrous. If partner has 2-1-5-5, the underlead is not necessary. Your part-ner is a very good player: he is supposed to be able to count the hand too. After cashing the A. lead a top heart: if partner has a trump left, he will have no trouble ruffing your trick and giving you a club ruff. Let your partner get in the Daily Bulletin.
3. Declarer play
You are in four hearts as West on this next hand. A spade is led. What is your best line of play to make ten tricks?
This is a hand from my Bridge Master declarer play computer program. Not, in fact, a very difficult hand, one that is intended for intermediate players. However, many of the experts who tried this problem at our booth in Orlando went down. The reason was the most common source of expert error: playing too quickly.
A novice might make the mistake of using the A to take the diamond finesse. They would make the contract whenever RHO held the K. An easy improvement is to draw two rounds of trumps and play the A and Q. The J will provide trick number ten. This looks so obvious that many experts stopped thinking at this point. A good habit to get into, before embarking on any line of play, is to ask yourself: what could go wrong?
The answer is not too difficult. On the above layout, LHO will win the K and play another diamond, and RHO will ruff out the J leaving the contract with no hope. The solution is also not difficult. After drawing only one round of trumps, lead the Q without cashing the A. The defense will win and cash two spade tricks, but declarer is in control. Declarer will be able to unblock the A and draw trumps, ending in the dummy. The J can then be used to discard declarer’s club loser.
Even the best players in the world occasionally make careless errors. If you are aspiring to expert status, beware the pitfalls I have described. You will always make mistakes, but if you can remember to:
1) Always maintain partnership discipline
2) Try to be sensible, not brilliant
3) Take your time, ask yourself, what could go wrong?
you will find your mistakes fewer and further between.


 Partner leads
 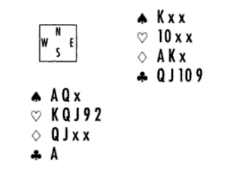 Your
Your  Partner did not have a trump left and the ‘brilliant’ play resulted in declarer’s making an overtrick. While —110 would have been below average, —140 was a zero. Yes, partner and LHO bid their hands poorly and declarer proba-bly misplayed the hand, but the ‘brilliant’ defense was truly horrible. How could this have been avoided? At the time of the problem, you know that partner is either 1-1-5-6 or 2-1-5-5. If partner has 1-1-5-6 (more likely as partner ran to two clubs, not two diamonds), the underlead in hearts will be disastrous. If partner has 2-1-5-5, the underlead is not necessary. Your part-ner is a very good player: he is supposed to be able to count the hand too. After cashing the
 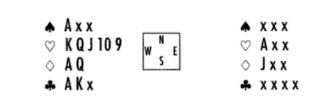 You are in four hearts as West on this next hand. A spade is led. What is your best line of play to make ten tricks?
This is a hand from my Bridge Master declarer play computer program. Not, in fact, a very difficult hand, one that is intended for intermediate players. However, many of the experts who tried this problem at our booth in Orlando went down. The reason was the most common source of expert error: playing too quickly.
A novice might make the mistake of using the
You are in four hearts as West on this next hand. A spade is led. What is your best line of play to make ten tricks?
This is a hand from my Bridge Master declarer play computer program. Not, in fact, a very difficult hand, one that is intended for intermediate players. However, many of the experts who tried this problem at our booth in Orlando went down. The reason was the most common source of expert error: playing too quickly.
A novice might make the mistake of using the  The answer is not too difficult. On the above layout, LHO will win the


")