Source: BridgeIndiaWhen, as a defender, you are about to attack from a holding such as J-x, Q-x or K-x, consider the possible advantage of leading a low card.Rixi Marcus
Rixi Marcus, was regarded as the best woman player in theworld, having won the woman’s pair championship of the world twice. She won the Mixed Team Olympiad, and Women’s Team Olympiad, and six European titles. Incredibly, the first of these were gained for Austria back in 1935.
Rixi wrote for the Guardian and Evening Standard and was the author of several books, so let her speak for herself:
‘When you, as a defender, are about to attack a suit in which you have holding such as J-x, Q-x or K-x, do you invariably lead the high card? Most players always do, but this is sometimes quite a costly mistake.
‘My bridge tip is that when you have to open up such a holding you should consider the possible advantage of leading the low card. This may well work better when the hand on your left is marked with strength in this suit, and especially when you have no re-entry to your hand.
‘Suppose, for example, that at some point during the defense you lead the king from K-x and the next hand wins with the ace from A-J-x. Now, if you yourself cannot regain the lead, your partner will be stymied – even if his holding is as strong as, say, Q-10-9-x. He will be unable to continue the suit except at the cost of a trick. Had you led low instead, the suit could have been cleared. (I am assuming, of course, that your partner is well endowed with entries.)
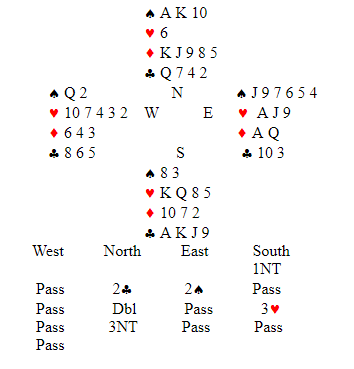
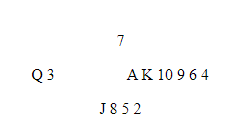
‘I was able to put this tip to good use in a recent rubber. South opened with a weak 1NT, showing 12 to 14 points, and finished in 3NT after a sequence below. What would you have led from the West hand?
South dealer, Neither side vulnerable
‘As South was unwilling to pass his partner’s penalty double of two spades, it seemed clear that the spade strength was likely to be in the dummy hand. Accordingly, in view of the absence of any re-entry to my own hand, I decided to lead the ª2 rather than the queen.
‘As you can see, declarer could no longer cope with his task. He won with the ace, entered his hand with a club, and led a diamond, losing to my partner’s queen. Declarer ducked the spade return, allowing my queen to hold, but I was able to put partner in with the ace of hearts to clear the spades. Now South could only take eight tricks.
‘It is easy to see that if West leads the queen of spades initially, declarer will win with the ace and make the contract, as East will be unable to attack spades effectively.
‘These situations occur quite frequently during the middle game, when it often pays to lead a small card from a doubleton honor. This is especially so when you can see three or four cards smaller than your honor in dummy – provided that your partner is an intelligent player that can interpret the meaning of your plan of action’
In the last paragraph, Rixi is thinking of this type of situation:
East is on lead and the defense needs two tricks from this suit. If East has no further entry he must lead the 5, not the 10, and West must read the situation; when he captures the queen with the Ace he must steel himself to return the suit.
There is an excellent example of Rixi’s Bols Bridge Tip in her book, Aces and Places,published by Secker &Warburg. She writes there:
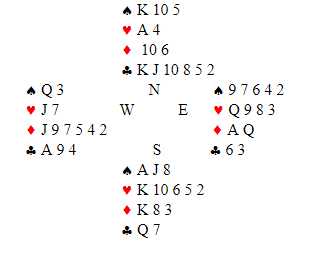
‘I am very ambitious about defense. With a good partner you can try and beat contracts which seem unbeatable; but you need co-operation, which you get only from a first-class partner. Here it was Benito Garozzo who understood my reason for an unorthodox but successful attempt to beat four spades, which was made at every other table.
East dealer, North-South vulnerable
‘After I had opened three hearts sitting East, South played in four spades and West led the queen of hearts. I overtook with the king and declarer won with the ace. He then crossed to dummy with a club and finessed a spade to Garozzo’s queen. I won the heart return, but what now? It seemed to me that with the clubs breaking even I had to set up a diamond trick quickly, at the same time attacking dummy’s entry. You will see that if I lead the jack of diamonds, West cannot continue the suit when in with ace of spades. So I had to find a low diamond’.
There is another situation where it may be right to lead low from a doubleton honor, though with different intent. Imagine a suit divided as follows:
East has opened with a preempt in his long suit, South has finished in 3NT, and West can tell, from the strength of his own hand, that his partner will have no side entry. If West leads the king the suit is dead; but if he leads low, and East puts in the 10, South will probably win the trick and communication will be established.
This is a variation of the same play:
East has opened in third hand, the opponents have reached 3NT, and West has about 8 points. He can be sure that he has little chance to establish and run his partner’s suit after the normal lead of the queen. He must lead the three and East must put in the 9 or 10, attempting South to win.
Quite often, the player in third position must make the critical play of low from a doubleton honor:
West leads the 7 and East can judge that his partner will have no quick entry. If East plays the king and follows with the jack, South will duck and the suit will be dead. East must play the jack, making it difficult for declarer to hold up the queen.
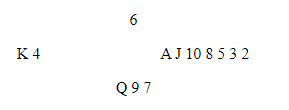
Sometimes there is an opportunity for pretty combination between the defenders:
North dealer, Neither side vulnerableSouth plays in 3NT after North has opened one club. West leads the 5. If East plays the ace and follows with the queen, South must duck and the diamond suit will shut out. East must put in the queen of diamonds at trick one. Unless he can read the situation, South will win. Then East must be given a chance to dispose of his blocking ace of diamonds on the third round of clubs.
Don’t forget to follow us @


 ‘As South was unwilling to pass his partner’s penalty double of two spades, it seemed clear that the spade strength was likely to be in the dummy hand. Accordingly, in view of the absence of any re-entry to my own hand, I decided to lead the ª2 rather than the queen.
‘As you can see, declarer could no longer cope with his task. He won with the ace, entered his hand with a club, and led a diamond, losing to my partner’s queen. Declarer ducked the spade return, allowing my queen to hold, but I was able to put partner in with the ace of hearts to clear the spades. Now South could only take eight tricks.
‘It is easy to see that if West leads the queen of spades initially, declarer will win with the ace and make the contract, as East will be unable to attack spades effectively.
‘These situations occur quite frequently during the middle game, when it often pays to lead a small card from a doubleton honor. This is especially so when you can see three or four cards smaller than your honor in dummy – provided that your partner is an intelligent player that can interpret the meaning of your plan of action’
In the last paragraph, Rixi is thinking of this type of situation:
‘As South was unwilling to pass his partner’s penalty double of two spades, it seemed clear that the spade strength was likely to be in the dummy hand. Accordingly, in view of the absence of any re-entry to my own hand, I decided to lead the ª2 rather than the queen.
‘As you can see, declarer could no longer cope with his task. He won with the ace, entered his hand with a club, and led a diamond, losing to my partner’s queen. Declarer ducked the spade return, allowing my queen to hold, but I was able to put partner in with the ace of hearts to clear the spades. Now South could only take eight tricks.
‘It is easy to see that if West leads the queen of spades initially, declarer will win with the ace and make the contract, as East will be unable to attack spades effectively.
‘These situations occur quite frequently during the middle game, when it often pays to lead a small card from a doubleton honor. This is especially so when you can see three or four cards smaller than your honor in dummy – provided that your partner is an intelligent player that can interpret the meaning of your plan of action’
In the last paragraph, Rixi is thinking of this type of situation: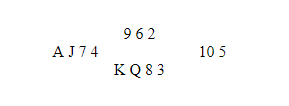 East is on lead and the defense needs two tricks from this suit. If East has no further entry he must lead the 5, not the 10, and West must read the situation; when he captures the queen with the Ace he must steel himself to return the suit.
There is an excellent example of Rixi’s Bols Bridge Tip in her book, Aces and Places, published by Secker & Warburg. She writes there:
‘I am very ambitious about defense. With a good partner you can try and beat contracts which seem unbeatable; but you need co-operation, which you get only from a first-class partner. Here it was Benito Garozzo who understood my reason for an unorthodox but successful attempt to beat four spades, which was made at every other table.
East dealer, North-South vulnerable
East is on lead and the defense needs two tricks from this suit. If East has no further entry he must lead the 5, not the 10, and West must read the situation; when he captures the queen with the Ace he must steel himself to return the suit.
There is an excellent example of Rixi’s Bols Bridge Tip in her book, Aces and Places, published by Secker & Warburg. She writes there:
‘I am very ambitious about defense. With a good partner you can try and beat contracts which seem unbeatable; but you need co-operation, which you get only from a first-class partner. Here it was Benito Garozzo who understood my reason for an unorthodox but successful attempt to beat four spades, which was made at every other table.
East dealer, North-South vulnerable ‘After I had opened three hearts sitting East, South played in four spades and West led the queen of hearts. I overtook with the king and declarer won with the ace. He then crossed to dummy with a club and finessed a spade to Garozzo’s queen. I won the heart return, but what now? It seemed to me that with the clubs breaking even I had to set up a diamond trick quickly, at the same time attacking dummy’s entry. You will see that if I lead the jack of diamonds, West cannot continue the suit when in with ace of spades. So I had to find a low diamond’.
There is another situation where it may be right to lead low from a doubleton honor, though with different intent. Imagine a suit divided as follows:
‘After I had opened three hearts sitting East, South played in four spades and West led the queen of hearts. I overtook with the king and declarer won with the ace. He then crossed to dummy with a club and finessed a spade to Garozzo’s queen. I won the heart return, but what now? It seemed to me that with the clubs breaking even I had to set up a diamond trick quickly, at the same time attacking dummy’s entry. You will see that if I lead the jack of diamonds, West cannot continue the suit when in with ace of spades. So I had to find a low diamond’.
There is another situation where it may be right to lead low from a doubleton honor, though with different intent. Imagine a suit divided as follows:
 East has opened with a preempt in his long suit, South has finished in 3NT, and West can tell, from the strength of his own hand, that his partner will have no side entry. If West leads the king the suit is dead; but if he leads low, and East puts in the 10, South will probably win the trick and communication will be established.
This is a variation of the same play:
East has opened with a preempt in his long suit, South has finished in 3NT, and West can tell, from the strength of his own hand, that his partner will have no side entry. If West leads the king the suit is dead; but if he leads low, and East puts in the 10, South will probably win the trick and communication will be established.
This is a variation of the same play:
 East has opened in third hand, the opponents have reached 3NT, and West has about 8 points. He can be sure that he has little chance to establish and run his partner’s suit after the normal lead of the queen. He must lead the three and East must put in the 9 or 10, attempting South to win.
Quite often, the player in third position must make the critical play of low from a doubleton honor:
East has opened in third hand, the opponents have reached 3NT, and West has about 8 points. He can be sure that he has little chance to establish and run his partner’s suit after the normal lead of the queen. He must lead the three and East must put in the 9 or 10, attempting South to win.
Quite often, the player in third position must make the critical play of low from a doubleton honor:
 West leads the 7 and East can judge that his partner will have no quick entry. If East plays the king and follows with the jack, South will duck and the suit will be dead. East must play the jack, making it difficult for declarer to hold up the queen.
Sometimes there is an opportunity for pretty combination between the defenders:
North dealer, Neither side vulnerable
West leads the 7 and East can judge that his partner will have no quick entry. If East plays the king and follows with the jack, South will duck and the suit will be dead. East must play the jack, making it difficult for declarer to hold up the queen.
Sometimes there is an opportunity for pretty combination between the defenders:
North dealer, Neither side vulnerable
 South plays in 3NT after North has opened one club. West leads the
  5. If East plays the ace and follows with the queen, South must duck and the diamond suit will shut out. East must put in the queen of diamonds at trick one. Unless he can read the situation, South will win. Then East must be given a chance to dispose of his blocking ace of diamonds on the third round of clubs.
Don’t forget to follow us @
5. If East plays the ace and follows with the queen, South must duck and the diamond suit will shut out. East must put in the queen of diamonds at trick one. Unless he can read the situation, South will win. Then East must be given a chance to dispose of his blocking ace of diamonds on the third round of clubs.
Don’t forget to follow us @


