Source: Safety Plays by Mike Graham
In this article Mike explains how to play various suit combinations to best effect, bearing in mind the difference between pairs and teams play.
Safety plays can be funny things. If you make a safety play, it is entirely possible that you will end up with one fewer trick than you might have done. In a pairs competition, this can be disastrous; in a teams event, you may suffer a 1-imp loss.
For example:
AJ65
K943
If we need four tricks from this combination then the play is to assume a 3-2 break with the queen well positioned. We start with the king (just in case East has a singleton queen – not that that will help us, but if we play to the jack first we end up with only two tricks in this scenario) and, if only small cards have appeared, follow by leading towards the ace-jack. If the queen appears from West, well, good; otherwise we will finesse the jack and hope.
However, if we need only three tricks, the situation is different. There is a guaranteed safety play for three tricks, but it is perhaps counterintuitive – we play the ace first. Then we lead a small card from dummy, and, if East plays small, we play the nine. This gains when East holds Q108x. If West has that holding, East will be showing out when we lead low from dummy – in which case we play the king and then lead up towards the jack in dummy. Somewhat inevitably, this led to a 1-imp loss when West started with Q108; virtue had to be its own reward.
However, in the same match, virtue brought in a 17-IMP swing when this was the vital suit:
AQJ65
842
Declarer was in 6NT and needed four tricks from this suit.
With plenty of entries, the opponents’ declarer played the simple line of finessing the jack on the first round. That proved the losing play when East turned up with the singleton king, as West’s 10973 was now worth a second defensive trick. Declarer moaned his poor fortune, but there was more to the position.
On a 3-2 break, declarer will always get four tricks, irrespective of the lie of the cards. However, it is worth thinking about the consequences of a 4-1 break. If East has four to the king, then nothing can be done. If West has four to the king, we get four tricks even if we finesse the jack first. However, if that is the case, it costs nothing to take the ace first, as we can then play from hand twice up to the QJ in dummy. And of the 4-1 splits, this gains when East’s singleton is the king. Fortunately, our declarer knew the safety play, and we could write 17 in the plus column.
Tens, nines, and eights play a useful role here, as they can be used to set up finesse positions. This combination:
A943
KQ1065
provides a guaranteed five tricks, as long as we start with the king (or the queen) first. If the suit is 2-2 or 3-1, there is no problem, but if the suit is 4-0 then one defender will be showing out. If West shows out, we can cross to the ace and lead back towards our queen-ten; and if East shows out we simply play a small card to dummy’s nine.
Incidentally, if you are East in this position and do hold J872, and declarer crosses to the ace and leads a small card….play the jack; declarer is quite likely to be expecting you to play small and might play his ten under your jack before he notices which card you have played!
Q107
AK9854
In a recent duplicate, this was declarer’s trump suit; he was in a grand slam. Without a care in the world, he won the opening lead and played a trump to the queen. It is clear looking at the spot cards that this is wrong. We can pick up Jxxx with either defender by playing the ace first. If either defender shows out we can finesse as appropriate. In practice, the trumps were 4-0, but it was declarer’s
lucky day – East held four to the jack and his trumps could be picked up without loss.
A754
KQ983
It looks all too easy to start with the king, but against a 4-0 division that is not safe. Here, we are missing J1062. If West has that holding, we will always lose one trick, as on a small card towards dummy West will play the ten, and will then retain the J62 behind our KQ9. However, if East holds the four cards, we can negate his holding by starting with a small card to the ace. Now we can lead towards our KQ9 and finesse twice against the J10.
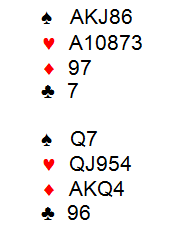
In the above examples, the suits have been taken in isolation. Sometimes, however, we must look at the hand as a whole before deciding our best line. This hand arose in a team trial:
The bidding went:
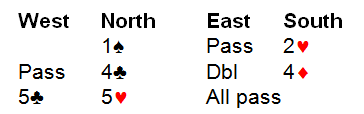
West led the king of clubs and switched to a diamond at trick two. Declarer won the diamond switch, and, chuntering about missing a slam, ran the queen of hearts. Well, he hadn’t missed a slam; the king of hearts was offside. And he didn’t make his game, either, as the diamond return was ruffed.
If the contract had been Six Hearts, that would be a reasonable line. With only three cards missing, it would be anti-percentage to play a heart to the ace. However, the contract was not Six Hearts, it was Five Hearts, and Five Hearts could be guaranteed by playing a heart to the ace. Against a 3-0 split, there would be no ruff, as there would be no defensive entries; and against a 2-1 split declarer could simply drive out the king of hearts and claim. This was in a team trial, too – you would almost hope that the king of hearts was offside, as then you have beaten all the pairs in six.
Although not relevant to safety plays, there is another aspect of the deal that is worth a short digression. The event was a team event, where your duty as declarer is simply to try to make your contract. You should not be bothered about any other possible contract. Here, declarer was in Five Hearts, but he took his eye off the ball and took a pairs line, trying to make as many tricks as possible.
However, let us consider the deal from a pairs perspective. We are missing two key cards, and it is unlikely these days that many pairs will bid six – the two missing keys might well be aces. Lack of the necessary number of aces does not always stop some pairs bidding slams, though, and here it is quite possible that a splinter/cue bid auction will lead to a slam contract.
So, in a pairs, we have to consider our line in Five Hearts with the suspicion in
the back of our mind that some pairs will be in Six. How should we play?
What will declarers in Six Hearts do? Given that the club lead is quite likely, they will need to avoid a trump loser. So, they will be taking the percentage line in trumps, which is to take the trump finesse. If the king is onside, well, and good; if it is offside, too bad. This means that the declarers in Six Hearts will be scoring up their slam if the king of hearts in onside, and going down when it is not (we can ignore any geniuses or people with good eyesight who drop the singleton king offside).
So, in Five Hearts, we are getting a bad score if the king is onside and a good score if it is not. There is a school of thought that says that as we will get a bad score if the king is onside we should play for it to be offside – in other words, play a heart to the ace.
But – there’s always a but – let us think of the alternatives. If the king is onside, declarers in Six will be making, and we will be getting a worse score. What can we do about that? Nothing – the die is already cast. If it is offside, we are getting a good score. So, obviously, we must hope that the king is offside.
However, we should still take the heart finesse, even though we are hoping it will lose. We cannot do anything about the declarers in Six, but we have to consider what other declarers who miss the slam will do. What we must not do is fall behind those declarers as well. If they take twelve tricks, so must we. What we are hoping for, of course, is to take eleven tricks (the second round of diamonds being ruffed was an unlikely scenario, even though it happened in practice), but, in a pairs, we should still play for the maximum.
Don’t forget to follow us @


